While implementing that we need to create "Model" project and "User Interface" project. Model used to store Entity, Views, ViewLinks , Associations and Application modules. User Interface stores Page Definitions, JSF pages.
Preparing Data Model

Figure: 1
Before proceeding with Entity Object creation we need to create a database connection in Jdeveloper IDE Connections and test using "Test Connection" button, and the Connection name appears under IDE Connections. Model object uses that connection.

Figure: 2
Create an entity object

Figure: 3
Database schema is automatically selected based on the already created database connection in IDE.

Figure: 4
Entity is created based upon a database table; we need to select proper table from a list of available tables which comes as an output of "Clicking on" the "Query" button.

Figure: 5

Figure: 6
"Emp" database table should have one Primary key defined on it. Otherwise it will ask for "ROWID" to be set as a primary key. I have used Empno as primary key.

Figure: 7
By selecting "Generate Entity Object class" we assure that a java class will be created with all getter and setter methods of "Emp" table.

Figure: 8
By default a View object is created with select statement subjected to all columns of underlying entity. Entity will be abstracted from user standpoint; only this view is exposed to them as data control. We will have a clear picture as we move forward with this blog.

Figure: 9
Views can't work alone until they are bounded with Application module. So we need to create an application module on top of the view.

Figure: 10

Figure: 11
We can attach more than one view here. In this work around I have single view so I have added that one with newly created Application Module.

Figure: 12

Figure:13
Preparing User Interface:

Figure: 14
Create a page with any of available template, any way we can modify our template any time we want while developing project.

Figure:15
Our page form is divided into two facets "first" and "second" horizontally. In second facet we can add one panel splitter which contains two facets dividing entire "second" facet into vertically. As a result of above code our entire page looks like below

Figure: 16

Figure: 17
From data control palate we need to select "EmployeeEntityObjectView" under "SampleAppModuleDataControl" and drag it to the region shown above. We will be prompted to use rich face from available rich faces. We need to select ADF Read Only Table.

Figure: 18
Search:

Figure: 19
Adding a where clause makes that view to be executed with parameters that comes from users who are trying to search the database tables based on Deptno and Empno.

Figure: 20
ThisDeptNo and ThisEmpNo is used as bind variables, so we need to define these two variables while creating View.

Figure 21

Figure: 22
To make sure that created view becomes accessible from User Interface project we need to add that view in data control and it can be done when that view is added in application module first.
Modifying User Interface:

Figure: 23

Figure: 24
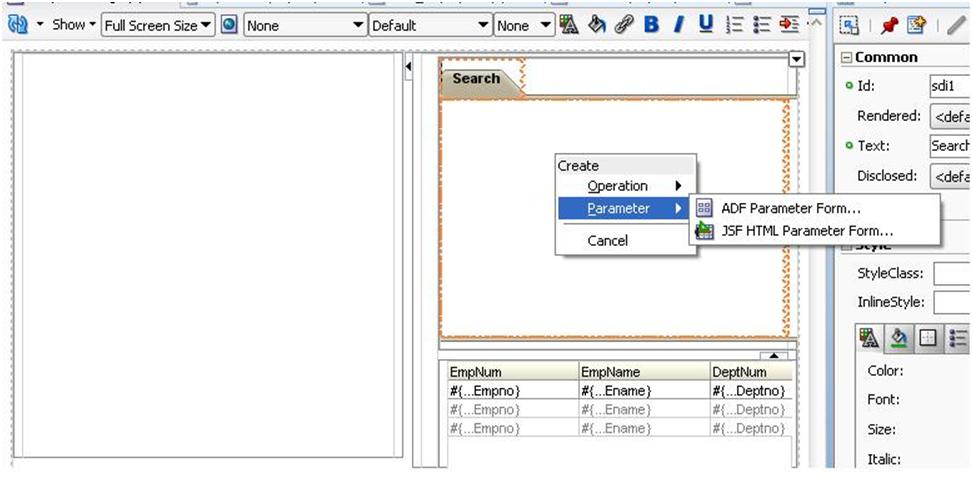
Figure: 25

Figure: 26

Figure: 27
Update:

Figure: 28
According to Figure 23 we have used "panelTabbed" with one Detail Item named "search". Now while incorporating update operation in our page we need to add one detail item named "update" after "search".
Same as we have done for retrieving data from table we need to select "EmployeeEntityObjectView" under "SampleAppModuleDataControl" and drag it to the region under "update" detail item. We will be prompted to use rich face from available rich faces.
We need to select ADF Form. We can retain all default labels in the wizard that appears next in our screen or we can change the label, but we need to select the checkbox that comes beside "Navigation pane" lower in that wizard.
By default our navigation pane consist of 4 command buttons like "First", "next", "Previous", "last", we can delete any of them if we don't require the functionality. I have deleted "First" and "Last" button. To let changed data be persisted in database we need to go to Data control palate and select "Commit" operation under "Operation" node of "SampleAppModuleDataControl" and drag it below form which is created to support update functionality. By default the button text comes as same name of operation (Commit) but we can change it. I have changed it to "update". We need to set the "Disabled" attribute to "default" from Property palate of that button.
As a result your entire page will become

Figure: 29
Create:
As discussed in previous section for incorporating updates functionality in our page, we can do the same for create operation also. Please refer below figures to do the same.

Figure: 30

Figure: 31
Delete:
We need to go to Data control palate and select "Delete" operation under "Operations" node of "EmployeeEntityObjectView" under "SampleAppModuleDataControl" and drag it below form which is created to support update functionality. By default the button text comes as same name of operation (Commit) but we can change it. I have changed it to "update". We need to set the "Disabled" attribute to "default" from Property palate of that button.
After Incorporating all functionality our complete page looks like

Figure: 32
Deploy and Test:
In Jdeveloper select "SampleADFPage.jspx" from list of applications and right click on it and you will get an option to run it. Once it is deployed in embedded server the page comes as below

Create an Employee:
- Click on "Create Another" button and then enter data in all corresponding fields and then click on "persist".
Delete an Employee:
- Click on "Delete" button and then click on "Persist".
Update an Employee:
- Go to Update tab
- Modify those fields that you want to modify and then click on "update" button.
No comments:
Post a Comment